Disclaimer: This post contains affiliate links, which means I receive compensation if you make a purchase using this link.

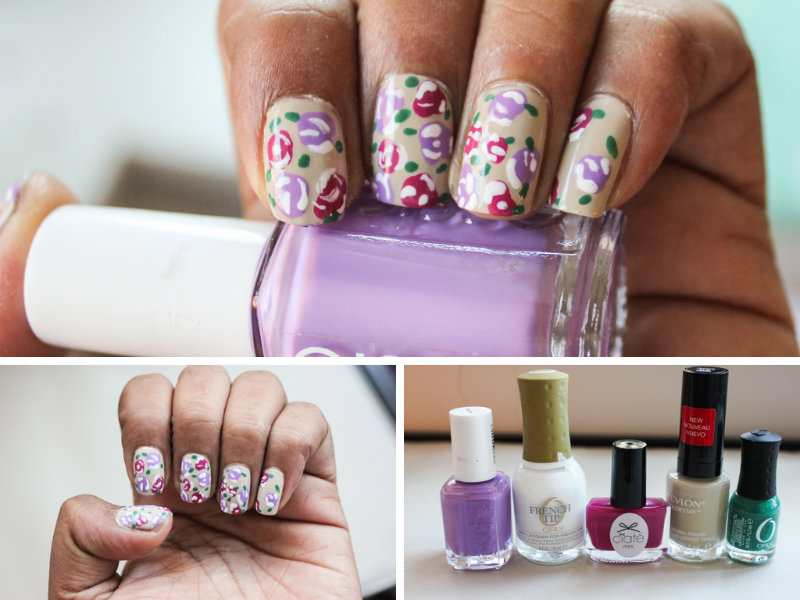
If you take a look at my Instagram , you’ll notice that most of my pictures consist of my weekly manicures. I started doing my own nails last year when I noticed how much money I was spending on mani-pedis at the salon. I started off pretty terrible and slowly I started experimenting with nail art. This week the weather here in SF has been amazing. I wanted to celebrate with a nice floral design. I used a tan base color so that my flowers would pop! I used the following nail polishes for my look:
Orly Rubber Base Coat
Tan: Revlon Colorstay- Bare Bones
Purple: Essie- Play Date
Pink: Ciate- Main Stage
White: Orly- French Tip
Green: Orly- Green with Envy
Sally Hansen Insta-Dry Top Coat
1. Paint your nails with a clear base coat and let it dry for a few minutes.
2. Paint your nails with the tan base coat.
3. Using a dotting tool or bobby pin, dot on pink and purple blobs onto each nail.
4. Using a toothpick or thin brush make small C’s with the white polish around the outer edges of the blobs and and a few in the center.
5. Using a toothpick , put small green dots on the outside of each flower as leaves.
6. Add top coat and clean up with nail polish remover and brush if needed.
If you are a visual learner YummyNails has a great tutorial on Youtube. 🙂


One Response
This is a beautiful color combination! 🙂
Comments are closed.